
1991 Mercury - best way to start out
#41
 05-26-2009, 09:08 PM


Yes allen wrenchs.. One of Ford's less bright ideas (GM used hex heds).. IF they are too tight to get loose let them be... Neversieze is a kind of silvery greasy stuff you put on bolt thread to help keep them from rusting tight..... ASk them at Autozone they should be able to hook you up.. It's great for steel bolts that thread into aluminum as the different metals tend to react and sieze together.. Never use it on things like Lug nuts though...
Here's how I flush everything while trying not to flush crap into the radiaor and heater core.. This has to be done with the thermostat in the engine... I got a replacement female end for a garden hose at the hardware that I clamp into the heater hose..
Disconnect the hose from the engine to the heater core from the heatercore.. (This hose is the one that comes off the intake manifold).. Remove the other hose from the heater core for now (the one that goes to the water pump).. Connect your garden hose to the heater hose going to the top of the intake, aim the other hose into a bucket if you'd like and turn on the water...
When it starts to run clear out of the other hose kill the water.. Remove the radiator cap and plug the other heater hose (Sitck something in it, or pinch it) Turn the water on again and let it flush crap out of the radiator cap.. This part it's hard to catch the water in a bucket.... Let the water run till it starts to run clear..
Kill the water again, reinstall the rad cap, keep the other heater hose plugged, and remove the upper radiator hose and start the water again.. Once again when it runs clear kill the water..
Now reconnect the other heater hose to the heater core.. Start the water, and yep you guessed it, let it run till it's clear...
I usually remove the overflow tank and try to clean it out as best as I can with the garden sprayer...
At this point everything shoudl be flushed and full of water.. Generally at this point I leave the water in the engine and add several spoonfulls of baking soda to the radiator and drive it for a day or so (An hour of runtime minimally to let it work).. Antifreeze generally becomes acidic with age which is what generally corrodes everything.. The baking soda weill help neutralize any acidic residues.. After some run time with the backing soda and water remove the heater hose that you connected the water hose to originally and the upper radiator hose and flush a buncgh of water though again.. A little backing soda left in the system won;t hurt anything so you don;t have to be as crazy about flushing this time..
Now reconnect the heater hose to the heater core and the upper hose, and disconnect the heater hose from the intake.. Open the drain on the radiator and drain out as much water as you can....
Close the drain and pour about 1.75 - 2 gallons of straight antifreeze in the radiator (NOT THE PREMIXED 50/50 STUFF).. WHen everything is full coolant will start coming out of the heater hose fitting on the intake.. If you need to get more antifreeze in and it just looks like water coming out of the fitting on the intake keep dumping antifreeze in.. It'll push some water out.. At this point you should have at least a gallon and a half in the engine.. IF more great!! (If it startes running green out of the fitting and you don;t have quite enough antifreeze in pour some of the remainder into the overflow tank.. A tad overfull is okay..) If you have almost all the antifreeze in the engine and it's still not running out the fitting, pour some antifreeze in the overflow then start topping the radiator with water.. Mainly you want some antifreeze in the overflow and the majority in the engine.. Eventually it will all mix..
Once the coolant is coming out of that fitting on the intake all the air is pretty much out.. Put the heater hose back on and start the car with the heat on full blast and the rad cap off.. If you have help have someone rev the engine a tad above idle and top off the radiator (if no help just top it off at idle).. Put the rad cap on and make sure the overflow is full (once again somewhat overfull is okay on the overflow tank)
Now run it till it gets up to temp and the thermostat opens... If you don;t have a gauge feel the upper hose and the radiator core (careful of that fan!!) When the hose and radiator are hot the thermostat is open.. At this point you can take it a drive to see how it does.. Look carefully for leaks (I'll elaborate later).. After your drive and everything cools down recheck the coolant levels in the radiator and overflow tank.. Top off as necessary..
Some of the flushes do have nasty chemicals in them.. Generally they remove the dirt that has been keeping things from leaking for years, and if there is any sort of a weak spot they finish the job of making a leak.... (Most radiator flushes have alot in common with either toilet cleaners or draino) However just the plain ole water can do the same so keep watch on everything when you are done.. Freeze plugs (on the engine block) heater cores, radiators and from time to time intake gaskets are what go.. Generally head gaskets are not a problem on the 5.0 Ford, but I won;t say it can;t happen...
#42
05-28-2009, 08:51 PM

Maxfax, thank you so much for your entire page of help. I am so thankful to have people that are so helpful to a noob like me. I have a few questions about what you had to say:
" IF they are too tight to get loose let them be... "
It doesn't matter if I get the Allen wrenches off the engine to drain the excess coolant? Is this because it will just get washed out later?
"Disconnect the hose from the engine to the heater core from the heatercore.."
This is probably A very stupid question.. what is the heater core? And how do I disconnect it? Is there a picture depiction I could see? I've been reading about it and am still confused on that part. And where are the heater core hoses you refer to?
"When it starts to run clear out of the other hose kill the water.. Remove the radiator cap and plug the other heater hose"
Once again heater hose, I really think I should know this.. sorry guys. When you say remove the radiator cap which cap do you mean? The one on the white tank or the steel one:

"Close the drain and pour about 1.75 - 2 gallons of straight antifreeze in the radiator"
How much pure radiator fluid should I stock up on for this whole project? Or is that something that can't really be determined?
One more question... If this does cause my freeze plugs to pop out or leak, what will happen? Are they easily replaceable or would I have to actually take the engine out of the car? Also, how many are there?
So in conclusion I really just need to learn a bit about the heater core, hoses and where the radiator drainer is. I know these questions are very foolish but I honestly don't quite understand. The flush style maxfax has described is DEFINITELY what I will go with. The idea of using baking soda to help clean it out is awesome!
Thank you guys for all of your help, I can't explain how helpful you all are!!!
~Stealthlead
" IF they are too tight to get loose let them be... "
It doesn't matter if I get the Allen wrenches off the engine to drain the excess coolant? Is this because it will just get washed out later?
"Disconnect the hose from the engine to the heater core from the heatercore.."
This is probably A very stupid question.. what is the heater core? And how do I disconnect it? Is there a picture depiction I could see? I've been reading about it and am still confused on that part. And where are the heater core hoses you refer to?
"When it starts to run clear out of the other hose kill the water.. Remove the radiator cap and plug the other heater hose"
Once again heater hose, I really think I should know this.. sorry guys. When you say remove the radiator cap which cap do you mean? The one on the white tank or the steel one:
"Close the drain and pour about 1.75 - 2 gallons of straight antifreeze in the radiator"
How much pure radiator fluid should I stock up on for this whole project? Or is that something that can't really be determined?
One more question... If this does cause my freeze plugs to pop out or leak, what will happen? Are they easily replaceable or would I have to actually take the engine out of the car? Also, how many are there?
So in conclusion I really just need to learn a bit about the heater core, hoses and where the radiator drainer is. I know these questions are very foolish but I honestly don't quite understand. The flush style maxfax has described is DEFINITELY what I will go with. The idea of using baking soda to help clean it out is awesome!
Thank you guys for all of your help, I can't explain how helpful you all are!!!
~Stealthlead
Last edited by Stealthlead; 05-28-2009 at 09:11 PM.
#43
05-28-2009, 11:04 PM
what is the heater core? And how do I disconnect it? Is there a picture depiction I could see? I've been reading about it and am still confused on that part. And where are the heater core hoses you refer to?
The hoses for this are about 1" in outside diameter and lead from the front of the engine to the passenger side of the firewall.(one on top on the intake manifold is the coolant to the core, the one on the water pump is the return from the core)
Once again heater hose, I really think I should know this.. sorry guys. When you say remove the radiator cap which cap do you mean? The one on the white tank or the steel one:
How much pure radiator fluid should I stock up on for this whole project? Or is that something that can't really be determined?
One more question... If this does cause my freeze plugs to pop out or leak, what will happen? Are they easily replaceable or would I have to actually take the engine out of the car? Also, how many are there?
TOmorrow when it is not raining like a bugger I can snap some pics of my crown vic to give you an idea of where these hoses lead.. I'll see if I can snap some pics of the freeze plugs you you can get an idea of what those look like and where they are at as well..
I know these questions are very foolish but I honestly don't quite understand.
#44
05-29-2009, 05:44 PM
That was VERY informative. Thank you very much! Pictures would be awesome!! I was thinking about it today, and if my freeze plugs were going to go bad, wouldn't they have already gone bad from the radiator fluid? I mean I'm not pouring ice cold freezing water into my car.. I don't see how that will have a more harsh effect then just plain radiator fluid going through it.
Thanks again!!
Thanks again!!
#45
05-29-2009, 06:15 PM

there are 2 freeze plugs per cylinder head. one in front and rear of the head. i know this because i had the driver rear freeze plug in cylinder head rot out. i have had front of engine apart and seen the front ones too.
#46
05-29-2009, 09:36 PM
I seriously doubt my freeze plugs would come out but if they do, it gives me a reason to do some deep work! I know you guys have helped out so much, and I hope I'm not over stepping my boundaries but if someone could get a good snap shot of the heater hoses that would rock!! I think I have a good idea right now.
Thanks a lot guys!! I've also been going to auto zone so much I've found a few guys to help me out with my air conditioner in the future! Car's are so awesome!
Thanks a lot guys!! I've also been going to auto zone so much I've found a few guys to help me out with my air conditioner in the future! Car's are so awesome!
#47
05-29-2009, 10:14 PM
This is eseentually what happens with the freeze plugs.. Over they years they can tend to rust from the inside out.. The same happens to the inside of your engine block, but it's much thicker and better metal so it doesn;t rust though as quick.. While these freeze plugs are rusting sediment and such (mostly old rust from all over the engine) settle at the freeze plugs since they are about the loest point that coolant flows.. All this junk settled at the freeze plugs actualyl helps keep them from leaking, sort of like stop leak.. But once you flush all the crap out there's nothing plugging the little pin holes that have formed in the freeze plugs from rust over the years.. IF they start leaking after you flush it they were pretty much shot anyhow, you just cleaned the dirt out that would have been plugging the holes...
Since my dig cam is being a &%&*@# I stole 87_Crown_Vic's pics and added some labels to give you an idea where to look for heater cose connections..

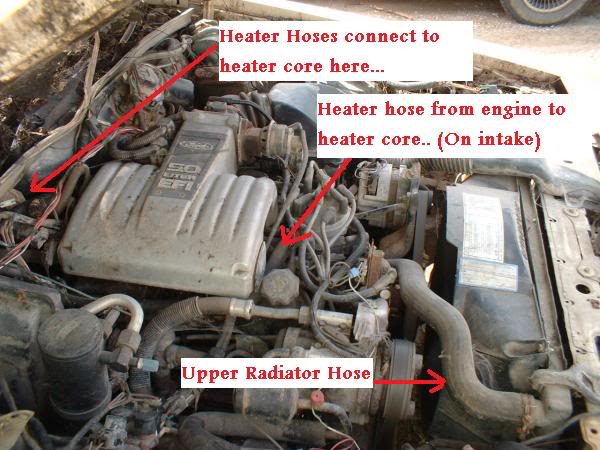
Still trying to dig up a good freeze plug pic...
Since my dig cam is being a &%&*@# I stole 87_Crown_Vic's pics and added some labels to give you an idea where to look for heater cose connections..
Still trying to dig up a good freeze plug pic...

#49
05-30-2009, 05:52 PM
Hey everyone! I wanted to update you and let you know what is going on. Before I move on this is really the time I could use some help in order not to seriously mess something up! I've made a lot of progress and don't want to seriously damage anything. I am also having loads of fun! 
First off, I woke up this morning and immediately drained out the radiator. I was starting to realize I had mistaken the radiator for the overflow tank, thus I was assuming it was the radiator that was extremely dirty when it was my over flow tank. As more and more radiator fluid dripped out, I was realizing my fluid looks very good, clean and delicious! (JK) Instead of doing the complete radiator flush max fax posted, I just decided to do the standard hose in the radiator technique which worked out great. And to max fax, sorry about not taking you up on your advice- I really didn't feel confident enough to mess with the heater tubs, I've already got enough on my plate! But eventually I will learn how, I am not neglecting your advice!!
After rinsing out a good 2 gallons of radiator fluid I spent no time loitering around - I moved on to the water pump and basically dismantling my car. I took off the fan and fan cover, belt, and upper radiator tub which I did thoroughly clean and inspect. I am happy to say it is defect free and looks new. The lower radiator on the other hand is a mess. Good thing I have spares! As I moved on more and more, I ran into bolts that were harder to get off then the one on my starter!! This is when I really started working that freeze off stuff and beating the hell out of my arms. But I am happy to say I did not get any stripped out, or anything to serious.
As I intruded further and further into the water pump I started to realize EVERYTHING is somehow connected to this guy. This is making it really difficult (but fun.) Let me give you a few pictures. This is where I am:
As you can see, the expansion tank has been removed and clean but the valve has actually been snapped off some time ago, if anyone knows where I can get a new expansion tank please let me know. Also, my fan is extremely filthy. Suggestions on the best way to clean the fan and clutch would be appreciated!
Here is the current problem that I'm facing. The water pump is connected to what I am assuming is the automatic transmission or power steering unit on the right side of the engine:

As you can see I've removed the two huge pain in the a** bolts, but am weary of what to do next.. I really need to know how to move this unit without damaging it to remove the water pump. As you can also see in that picture the unit will have to be moved, maybe not completely taken out, to remove the water pump. What are the procedures I need to take in order to achieve this?
The other problem I'm facing is right on the other side, its the accessory belt:

See what I mean? The belt needs to be taken off and the conditioner needs to be at least moved to get to the arm holding the water pump in.

I have taken the little arm off (Which I have no idea what that little box thing is that is attached to it) and moved it aside still hooked up.
Here is another angle to help understand the automatic transmission unit problem

Here is another overall picture.

So in conclusion, I need to know how I can take that automatic transmission/power steering (whichever it is, can someone clarify?) unit off safely, and at least move the air condition unit to move the belt to move the arm to release it from the water pump. If anyone needs more pictures I'm here. Thanks for all the help!! I hope I don't screw anything up!
~Stealthlead
First off, I woke up this morning and immediately drained out the radiator. I was starting to realize I had mistaken the radiator for the overflow tank, thus I was assuming it was the radiator that was extremely dirty when it was my over flow tank. As more and more radiator fluid dripped out, I was realizing my fluid looks very good, clean and delicious! (JK) Instead of doing the complete radiator flush max fax posted, I just decided to do the standard hose in the radiator technique which worked out great. And to max fax, sorry about not taking you up on your advice- I really didn't feel confident enough to mess with the heater tubs, I've already got enough on my plate! But eventually I will learn how, I am not neglecting your advice!!
After rinsing out a good 2 gallons of radiator fluid I spent no time loitering around - I moved on to the water pump and basically dismantling my car. I took off the fan and fan cover, belt, and upper radiator tub which I did thoroughly clean and inspect. I am happy to say it is defect free and looks new. The lower radiator on the other hand is a mess. Good thing I have spares! As I moved on more and more, I ran into bolts that were harder to get off then the one on my starter!! This is when I really started working that freeze off stuff and beating the hell out of my arms. But I am happy to say I did not get any stripped out, or anything to serious.
As I intruded further and further into the water pump I started to realize EVERYTHING is somehow connected to this guy. This is making it really difficult (but fun.) Let me give you a few pictures. This is where I am:
As you can see, the expansion tank has been removed and clean but the valve has actually been snapped off some time ago, if anyone knows where I can get a new expansion tank please let me know. Also, my fan is extremely filthy. Suggestions on the best way to clean the fan and clutch would be appreciated!
Here is the current problem that I'm facing. The water pump is connected to what I am assuming is the automatic transmission or power steering unit on the right side of the engine:
As you can see I've removed the two huge pain in the a** bolts, but am weary of what to do next.. I really need to know how to move this unit without damaging it to remove the water pump. As you can also see in that picture the unit will have to be moved, maybe not completely taken out, to remove the water pump. What are the procedures I need to take in order to achieve this?
The other problem I'm facing is right on the other side, its the accessory belt:
See what I mean? The belt needs to be taken off and the conditioner needs to be at least moved to get to the arm holding the water pump in.
I have taken the little arm off (Which I have no idea what that little box thing is that is attached to it) and moved it aside still hooked up.
Here is another angle to help understand the automatic transmission unit problem
Here is another overall picture.
So in conclusion, I need to know how I can take that automatic transmission/power steering (whichever it is, can someone clarify?) unit off safely, and at least move the air condition unit to move the belt to move the arm to release it from the water pump. If anyone needs more pictures I'm here. Thanks for all the help!! I hope I don't screw anything up!
~Stealthlead
Last edited by Stealthlead; 05-30-2009 at 05:58 PM.
#50
05-30-2009, 09:31 PM
Alright guys, I have even more of an update. I realized it was the pulley that needed to come off the accessories belt to move that arm to move the exhaust control unit. I did all of this. I also just pushed the power steering unit aside. So I guess you can pretty much disregard most of the questions asked in my last post. The problem I'm dealing with now is all of the radiator fluid. When I took off the water pump there was still a LOT in the engine. It has leaked out to the point where its not leaking any more but its right up to the water pump slots and I can see it. Is it okay to install the new water pump like this? I am just dreading remembering to get everything on the way it came off....